


TL;DR
This article walks you through integrating UiPath with Google Workspace products to automate workflows by connecting to the UiPath Orchestrator API using Google Apps Script. Learn how to create queue items, read from queues, and start jobs. Essential code snippets include setting up the Apps Script project, authenticating with the Orchestrator API, and performing API calls to manage queues and jobs.
Why you should care
In the age of automation, finding ways to streamline operations is paramount. UiPath, a leader in robotic process automation (RPA), offers robust solutions for automating repetitive tasks. However, integrating these solutions with other cloud platforms, like Google Workspace, can unlock even greater efficiencies. This is where Google Apps Script comes in, acting as a bridge between UiPath and all the Google products that we love. Imagine automating the data flow between Google Sheets and UiPath queues, or initiating UiPath processes directly from a Google Form submission. The potential for time savings and error reduction is immense. But how exactly can you connect UiPath’s power with the versatility of Google Apps Script? That’s what we’re here to explore!
The Deep Dive
0. Setup
We will need to create two components: a UiPath External App and a Google Apps Script project/file. We need access to UiPath Orchestrator and a Google account where we can create a new Google Apps Script file.
UiPath External App:
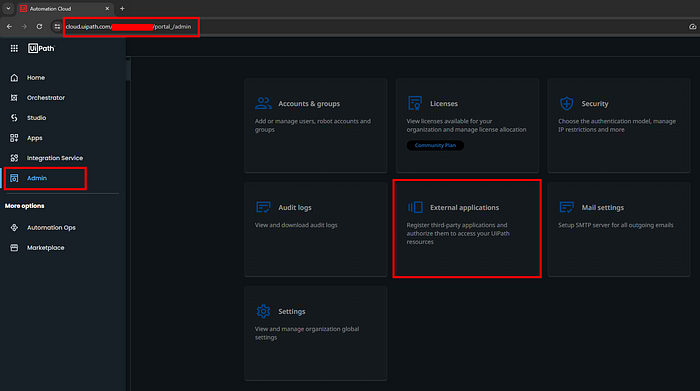
Navigate to UiPath Automation Cloud (we can find this at https://cloud.uipath.com or a non-cloud Orchestrator URL)
Navigate to “Admin” settings
Click “External Applications”
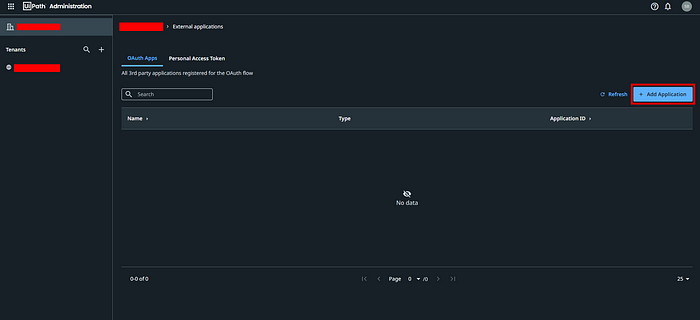
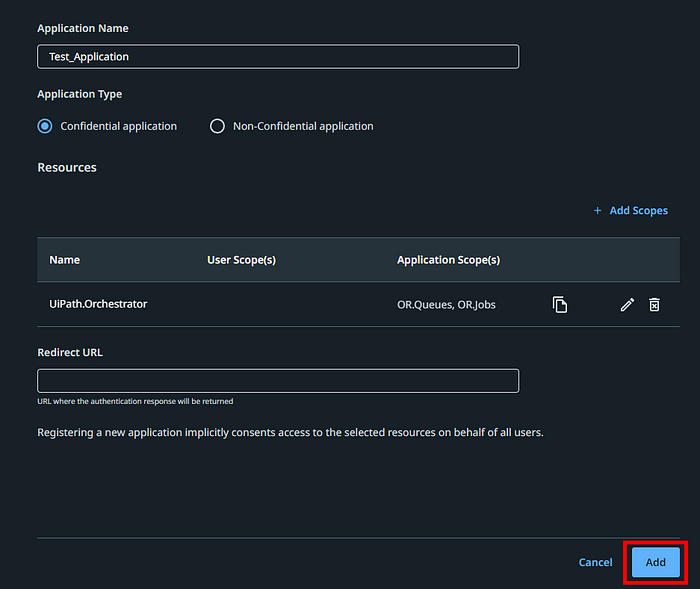
- Click “Add Application”
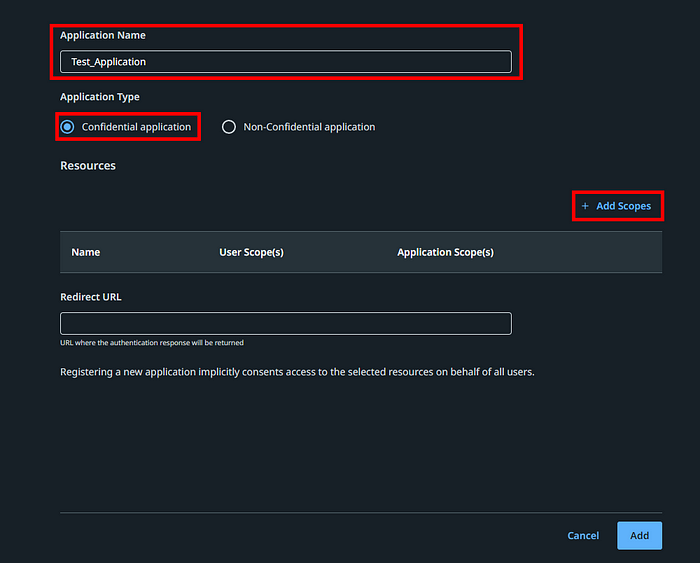
Add an Application Name
Select “Confidential application” for the Application Type
Click “Add Scopes”
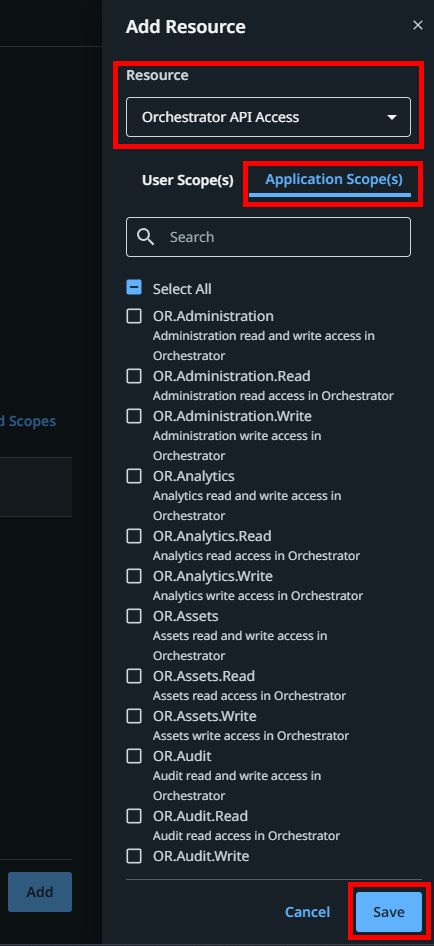
Select “Orchestrator API Access” under the Resources dropdown
Click “Application Scopes”
Select the following scopes: OR.Queues, OR.Jobs, and OR.Execution
Click “Save”
- Click “Add” to create our application
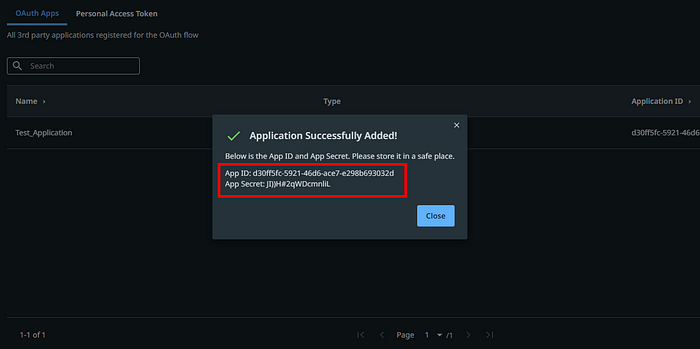
- Copy the “App ID” and “App Secret” from the confirmation message
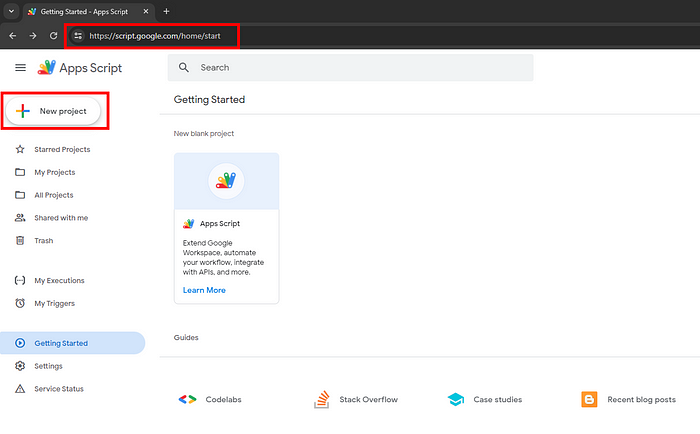
Google Apps Script file:
Navigate to https://script.google.com/home/start
Click “New project”
- Name the project
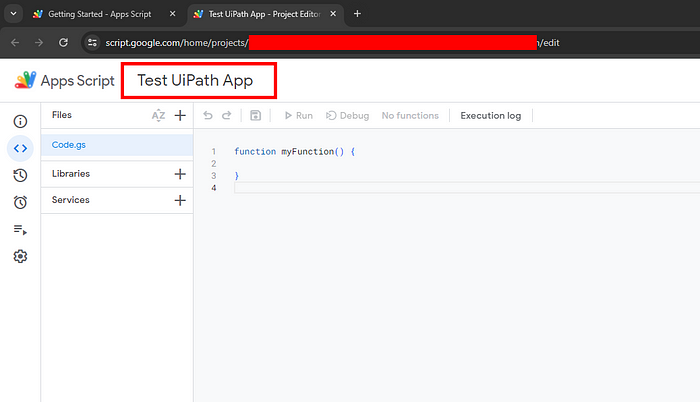
That’s it! We are all set up to begin writing calls to Orchestrator.
1. Authenticating with the Orchestrator API
Authentication is the first step in enabling communication between Google Apps Script and UiPath Orchestrator. In this example, we will be using the App ID and App Secret from the External Application we created previously.
Note*: The Orchestrator API also has other methods of authentication depending on each use case (see the Resources section for links)*
We will start by adding our App ID and App Secret to the Google Apps Script project using the Script Properties.
Navigate to “Project Settings”
Click “Add script property”

Add the App ID and App Secret as new properties
Click “Save script properties”
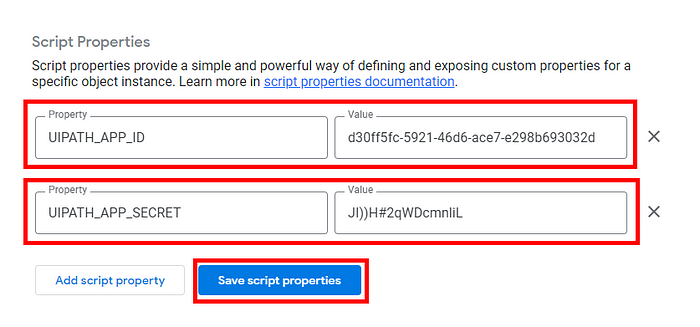
- Navigate back to the “Editor” screen

The following code snippet is used to request an authorization token from the UiPath Orchestrator API. We will use this token in all subsequent calls to create queue items, read queue items, and start jobs. It is important to note that these tokens will expire after 60 minutes, in which case we will need to make another token request.
const ScriptProperties = PropertiesService.getScriptProperties();

// function to get authorization token from uipath orchestrator api
function getAuthToken()
{
    // token endpoint
    const url = 'https://cloud.uipath.com/identity_/connect/token';
    // api headers
    const headers = {"Content-Type": "application/x-www-form-urlencoded"};
    // api body
    const body = `grant_type=client_credentials&client_id=${ScriptProperties.getProperty("UIPATH_APP_ID")}&client_secret=${ScriptProperties.getProperty("UIPATH_APP_SECRET")}&scope=OR.Queues+OR.Jobs+OR.Execution`;
    // make api call and get response
    const response = UrlFetchApp.fetch(url,{"method": 'POST', "headers": headers, "payload": body});

    // check for success
    if(response.getResponseCode() == 200)
    {
      // parse json string response
      const data = JSON.parse(response.getContentText());
      // return access token
      return data["access_token"];
    } else
    {
      // return null if not successful
      return null;
    }
}
When this code is run for the first time, a few permission prompts will come up. We can click through them to allow access for this project to your Google account.
2. Creating Queue Items
Once authenticated with the token, we can begin to interact with the Orchestrator API services within the token scope. In our case, we will be working with Queues and Jobs.
To create a queue item, there are specific requirements for how the data should be formatted. Below is an example of required values for creating a queue item via the Orchestrator API:
// data for the create queue item call
const queueItem =
{
    "Name": "Test Queue", // queue name in uipath
    "Priority": "Normal", // values must be High, Normal, or Low
    "SpecificContent": // dictionary containing queue item data
    {
        "property1": "testValue1",
        "property2": "testValue2",
        "property3": "testValue3"
    },
    //"DeferDate": "2024-02-05T05:01:20.800Z", // not required, DateTime
    //"DueDate": "2024-02-05T05:01:20.800Z", // not required, DateTime
    //"RiskSlaDate": "2024-02-05T05:01:20.800Z", // not required, DateTime
    //"Reference": "TestReference", // not required, string
    //"Progress": "Test Progress", // not required, string
    "Source": "Apps"
}
Once we have retrieved the data for the queue item, we will need to gather the following pieces of information about our UiPath Orchestrator instance: Organization Name, Tenant Name, and Folder ID.
These can be found by navigating to the Orchestrator queue and inspecting the URL:

With these details, we can make the call to the Orchestrator API to create a queue item. Here is the code snippet demonstrating this:
// function to create a queue item in a uipath orchestrator queue
function createQueueItem(_orgName, _tenantName, _token, _folderId, _specificContent)
{
    // create queue item endpoint
    const url = `https://cloud.uipath.com/${_orgName}/${_tenantName}/orchestrator_/odata/Queues/UiPathODataSvc.AddQueueItem`;
    // api headers
    const headers =
    {
        "Content-Type": "application/json;odata.metadata=minimal;odata.streaming=true",
        "X-UIPATH-OrganizationUnitId": _folderId,
        "Authorization": "Bearer " + _token,
        "Accept": "application/json"
    };
    // api body
    const body ={"itemData": _specificContent}
    // make api call and get response
    const response = UrlFetchApp.fetch(url,{"method": 'POST', "headers": headers, "payload": JSON.stringify(body)});
    // check for success
    if(response.getResponseCode() == 201)
    {
      // parse response
      const data = JSON.parse(response.getContentText());
      // return access token
      return data;
    } else
    {
      // return null if not successful
      return null;
    }
}
3. Getting Queue Items
To get queue items, we will need the same Orchestrator information as above. By default, this request will return all queue items associated with the Folder ID provided.
Note*: This request limits the response to a maximum of 1000 queue items*
If the folder has multiple queues, all items from each queue will be returned in the response. To filter the results by a specific queue, we can provide the Queue ID as an additional parameter to the request.
The following function will handle requests with or without a Queue ID provided:
// function to get queue items from an orchestrator folder
function getQueueItems(_orgName, _tenantName, _token, _folderId, _queueId=null)
{
    // get queue items endpoint
    const url = `https://cloud.uipath.com/${_orgName}/${_tenantName}/orchestrator_/odata/QueueItems` +  (_queueId == null ? "" : `?\$filter=QueueDefinitionID eq ${_queueId}`);
    // api headers
    const headers =
    {
        "X-UIPATH-OrganizationUnitId": _folderId,
        "Authorization": "Bearer " + _token,
        "Accept": "application/json"
    };
    // make api call and get response
    const response = UrlFetchApp.fetch(url,{"method": 'GET', "headers": headers});
    // check for success
    if(response.getResponseCode() == 200)
    {
      // parse response
      const data = JSON.parse(response.getContentText());
      // return access token
      return data;
    } else
    {
      // return null if not successful
      return null;
    }
}
4. Starting Jobs
We can also start jobs using the Orchestrator API. To start a job, we need to identify the package’s Release Key.
Navigate to “Automations” in Orchestrator
Click either “Edit” or “Monitor Process”
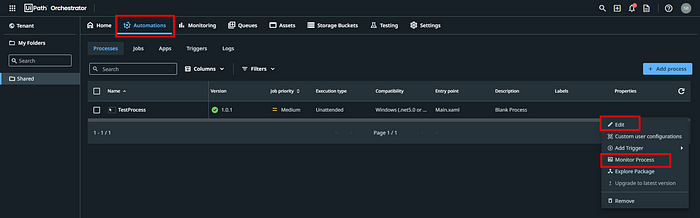
- Inspect the URL for the Process Key

Once we have the process key, we need to make an Orchestrator API call to get the Release Key. Here is the code:
// function to get release key for a process
function getRelease(_orgName, _tenantName, _token, _folderId, _processKey)
{
    // get release key endpoint
    const url = `https://cloud.uipath.com/${_orgName}/${_tenantName}/orchestrator_/odata/Releases(${_processKey})`;
    // api headers
    const headers =
    {
        "X-UIPATH-OrganizationUnitId": _folderId,
        "Authorization": "Bearer " + _token,
        "Accept": "application/json"
    };
    // make api call and get response
    const response = UrlFetchApp.fetch(url,{"method": 'GET', "headers": headers});
    // check for success
    if(response.getResponseCode() == 200)
    {
      // parse response
      const data = JSON.parse(response.getContentText());
      // return release key
      return data["Key"];
    } else
    {
      // return null if not successful
      return null;
    }
}
Using the Release Key, we can finally build the request to start a job. Below is an example of a request body as well as the function to start a job using Orchestrator API:
// body for the api using required information
const startInfo =
{
  "ReleaseKey": releaseKey, // the release key we retrieved above
  "JobsCount": 1,
  "JobPriority": "Normal",
  "Strategy": "ModernJobsCount",
  "ResumeOnSameContext": false,
  "RuntimeType": "Unattended",
  "InputArguments": "{}",
  "MachineRobots": []
};

// function to start job in orchestrator
function startJob(_orgName, _tenantName, _token, _folderId, _jobDetails)
{
    // start job endpoint
    const url = `https://cloud.uipath.com/${_orgName}/${_tenantName}/orchestrator_/odata/Jobs/UiPath.Server.Configuration.OData.StartJobs`;
    // api headers
    const headers =
    {
      "X-UIPATH-OrganizationUnitId": _folderId,
      "Accept": "application/json",
      "Authorization": "Bearer " + _token,
      "Content-Type": "application/json;odata.metadata=minimal;odata.streaming=true"
    };
    // api body
    const body ={"startInfo": _jobDetails}
    // make api call and get response
    const response = UrlFetchApp.fetch(url,{"method": 'POST', "headers": headers, "payload": JSON.stringify(body)});
    // check for success
    if(response.getResponseCode() == 201)
    {
      // parse response
      const data = JSON.parse(response.getContentText());
      // return job data
      return data;
    } else
    {
      // return null if not successful
      return null;
    }
}
And that’s it! We now have a few functions to start automating basic workflows between UiPath and Google Workspace.
The Final Byte
Integrating UiPath with Google Apps Script opens up a realm of possibilities for automation. By leveraging the Orchestrator API via Google Apps Script, you can automate data flow, start jobs, and streamline operations, all from the familiar interface of Google Workspace. This guide provides a basic foundation, but the true potential lies in tailoring the integration to fit your specific needs. Whether you’re automating invoice processing, data entry, or any other repetitive task, the combination of UiPath and Google Apps Script can significantly enhance your productivity and accuracy. Embrace the power of automation and see how it transforms your workflows.
Thanks for reading, until next time!
Helpful Resources
UiPath Orchestrator API docs:
UiPath Orchestrator API docs for External Application authentication:
External APIs with Google Apps Script:
Great article on Google Apps Script libraries: